Why Choose This DIY Journey?
Imagine a home where dry winter air is a thing of the past, where your furniture stays pristine, and your skin feels hydrated—all thanks to the Aprilaire 800’s superior steam humidification. This guide is your ticket to faster installation, fully automated operation, and whole-house protection, all while keeping maintenance costs low. Yes, it’s more complex than a basic humidifier, requiring water, power, and new drains, and it may sip more electricity or struggle with hard water. But the rewards? A truly comfortable home of up to 5000 sq ft all year round.
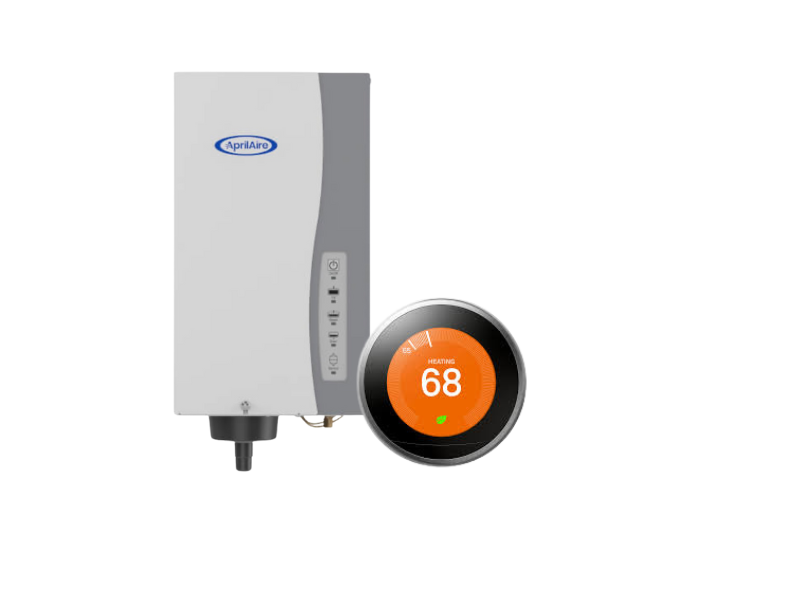
This guide is specifically designed to connect the AprilAire 800 to the Nest 3rd or 4th Gen Learning Thermostat. This means you do not need to install the Humidistat or the outdoor temperature sensor that is included with the unit.
Table of Contents
The Ultimate DIY Guide to Installing the Aprilaire 800 Humidifier with Nest – Unleash Your Inner Pro!
Are you ready to transform your home’s air quality with the Aprilaire 800 humidifier while saving a bundle on professional installation costs? Contrary to the daunting tales you might find scattered across the internet, this powerful unit is a DIY dream waiting to be conquered! Sure, the Aprilaire 800 arrives with only about half the components you’ll need, but with the right accessories and this thrilling step-by-step guide, you’ll install it like a seasoned expert. Let’s dive into the adventure of creating a healthier, more comfortable home environment!
Masterful Planning: Set the Stage for Success
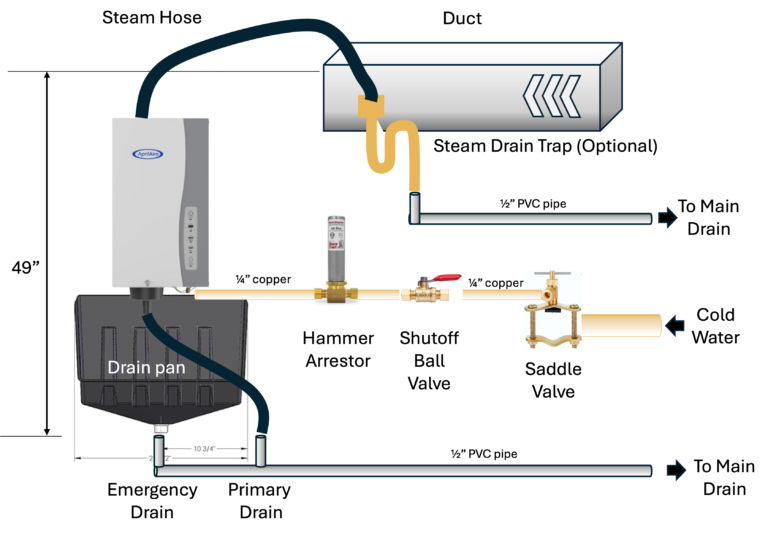
Before you wield your tools, let’s strategize like a pro. The Aprilaire 800 works best when installed within 6 feet of your duct, with a minimum vertical drop of 49 inches (with a drain pan) or 32 inches (without) from the duct hole for the steam to the lowest water drain access. If the top of the humidifier’s sits above the steam hole in the duct, you will need to buy a steam pipe kit. If the bottom of the unit is below below your drain level, a sump pump will save the day.
- Find the Perfect Spot: For vertical basement HVAC ducts, pinpoint a spot on the central duct. For horizontal ceiling ducts, scout a location under 4 feet from the supply duct—perfect for crafting a mini-wall to mount your humidifier.
- Wire It Right: Measure the distance from your HVAC to the main electrical panel, then add 30% to determine the length of 10/2 Romex wire to order.
- Enhance your Nest: Simply add 1 extra wire between your Nest 3rd or 4th Gen Learning thermostat to control the AprilAire 800. No need to punch more holes in your wall to add yet another controller.
- Plumb with Precision: Measure from your duct or mini-wall to the nearest plumbing down-pipe, sump, or drain, then add 125% for the length of 1/2” PVC pipes (primary, secondary, and overflow drains). Check local codes—some allow hooking into HVAC drains!
- Water Line Wizardry: Locate the nearest copper or PEX cold water pipe, measure back to the humidifier, and add 25% to order a 1/4” copper line extension kit.
- Power Up: Identify a 2-circuit spot on your main electrical panel for a 2-pole 20A breaker—your humidifier’s energy lifeline.
With your plan locked in, you’re ready to gather your gear!
Gear Up: Your Shopping List for Victory
Here’s the treasure trove of accessories to turn your Aprilaire 800 into a professional-grade installation. You can click on each item to order or you can use the links I have provided below to automatically build you an Amazon cart with everything you need, including the humidifier. All of the additional parts and accessories cost around $450 in addition to the humidifier cost. The AprilAire 800 humidifier includes a Humidistat controller if you don’t like the Nest option shown in this guide. The typical cost of a professional installation is $2500 to $5000.
- The Star of the Show: Aprilaire 800 humidifier
- Humidity Controller: Nest 3rd Generation Learning Thermostat
- Plumbing Powerhouse:
- Drain pan
- 1/4” copper water line extension kit
- 1/4” insulation for water line
- 1/4” ball valve
- 1/4” water hammer preventer
- Trace heater kit (for winter temps below 20°F)
- 1/2” PVC pipes (10ft lengths for primary, secondary, and overflow drains)
- 1/2” PVC elbows
- 1/2” PVC brackets
- 1-1/4” to 1/2” reducer (for drain pan connection)
- 2x2x1-1/2” DMV tee reducer (vertical vent drain)
- 4028 Aprilaire drain trap kit (required if AprilAire 800 steam head is higher than the steam unit)
- Aprilaire 4856 High Temperature Condensate Pump (required if AprilAire drain is lower than your sewer connection)
- Electrical Essentials:
- 20 or breaker for main panel (choose correct type for your main panel make/model)
- 10/2 Romex wire
- 240V-20A master isolation switch
- 1/2” knockout connectors x2 for wiring into AprilAire 800
- 18/2 solid copper x 20ft for control wiring
- AWG 16-14 quick disconnect connectors to connect relay
- Thermostat relay (for Nest 3rd gen control)
- 1-gang electrical box for isolation switch
- 1-switch cover plate
Disclosure: Every time you buy using one of these affiliate links, it helps fund making more reviews and guides.
Use the links below to automatically build your shopping cart
Buy Humidifier

Buy accessories
Buy Steam Trap (optional)

Buy Sump Pump (optional)
Step 1: Mounting the Humidifier

Find a location within 6 ft of the output duct for your HVAC system. Ideally, you need 49″ of vertical height between the hole in the duct for the steam injector to the height of the sewer drain. This makes sure the steam pipe is always going uphill and the drain pipe is always angled downhill.
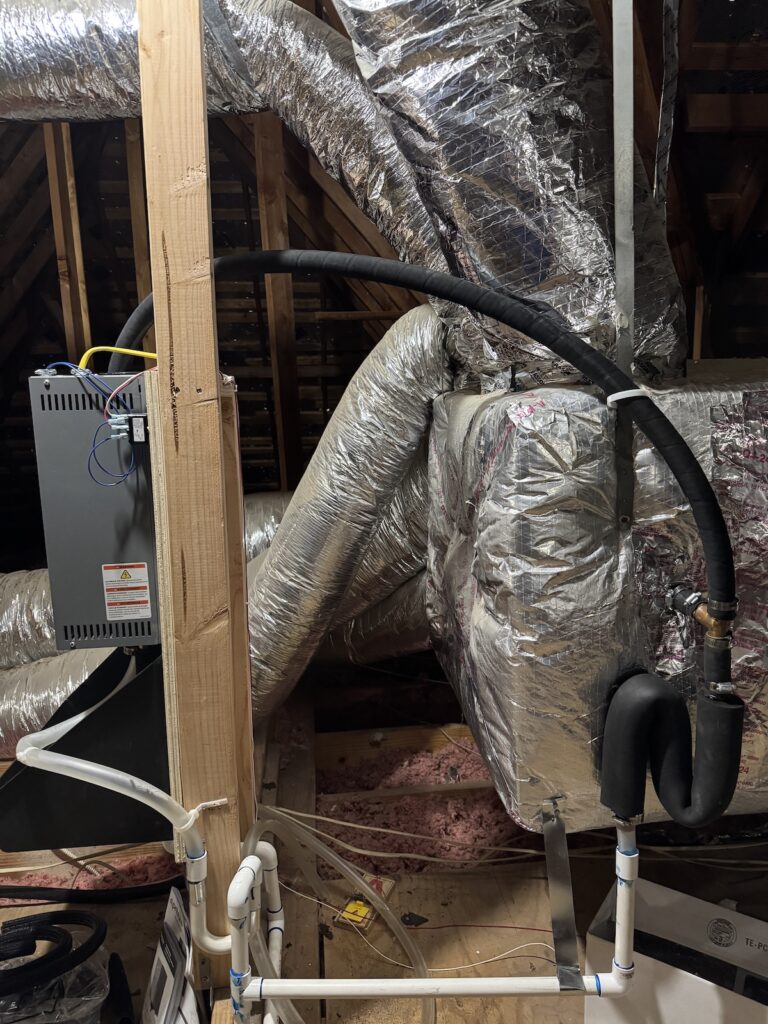
In the installation above, the duct is lower than the humidifier (see red arrow), so a 4028 AprilAire Steam Trap accessory kit was installed to drain any steam that condenses to water into a secondary drain.
In this installation, there was no space to mount directly on the duct, so a mini-wall 18″ x 30″ was built from 4×2 and plywood to mount the humidifier. A drain pan is mounted directly underneath the humidifier in case of leaks and to make sure no water leaks when the steam canister is changed periodically.
Step 2: Setup Electrical and Control
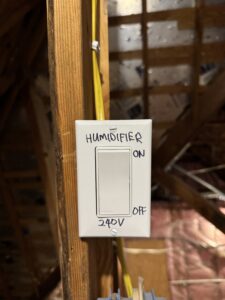
The AprilAire 800 on the highest steam setting uses up to 16A on 240V. You will need to run a dedicated 20A line back to a 2-pole breaker on your main panel. Most installations can use Romex 12/2, which is 20A rated. Just like your HVAC system, it needs a local 240V 2-pole switch close to the humidifier to turn it on/off for servicing. The AprilAire 800 has 2 x 1/2 knockouts on top for power and control wiring. You will need to buy additional 2x 1/2″ knockout cable connectors, 1 for control and 1 for power.
Run L1, L2 and Ground from the humidifier to the isolation switch with the Romex 12/2 wire, then run the isolation switch back to your main panel with a 20A breaker with Romex 12/2 wire. The default power setting is 11A, so if you want more steam toggle the DIP switch to use 16A.
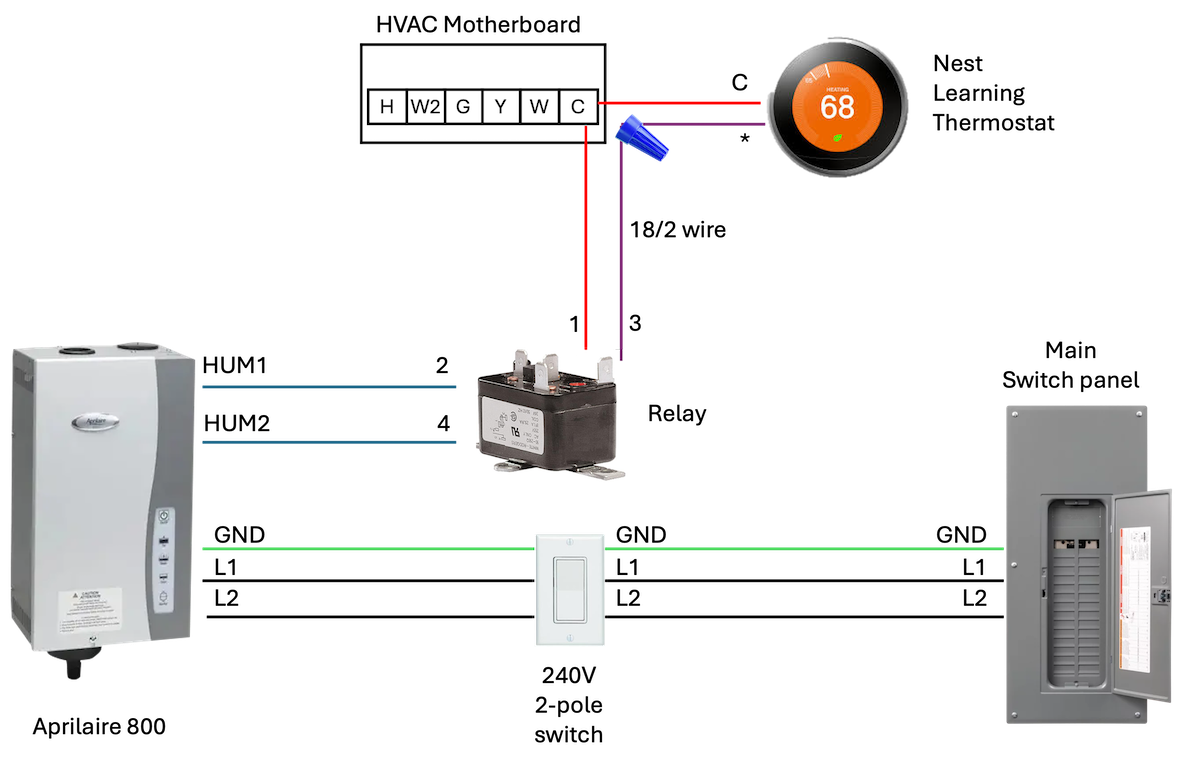
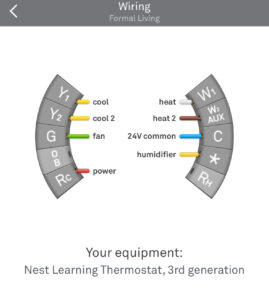
If you already have a Nest 3rd or 4th Gen learning thermostat installed, only connect an extra wire to the * terminal for the Humidifier. If you don’t have an extra wire, that means you will need to order and install new 18 gauge multi-core wire. Count how many wires you already have and then add 1 more to order the right 18 multicore. Most systems can use 18/8. If replacing, match all of the colors for your original install, then use a spare color for the * wire connection. The C wire for power should already be installed between Nest and HVAC, this is how the Nest gets its power. The * wire connects directly to pin 3 on the relay by using a wire nut inside the HVAC motherboard enclosure to connect to one of your relay wires. Use 18/2 solid copper wire from the HVAC to the Relay and a separate piece from the relay to HUM1/HUM2. The 1 pin on the relay connects back to the same C (common) terminal as the Nest C wire on the HVAC motherboard. Make sure you add quick connect blades to all control wires so you can easily connect to the relay.
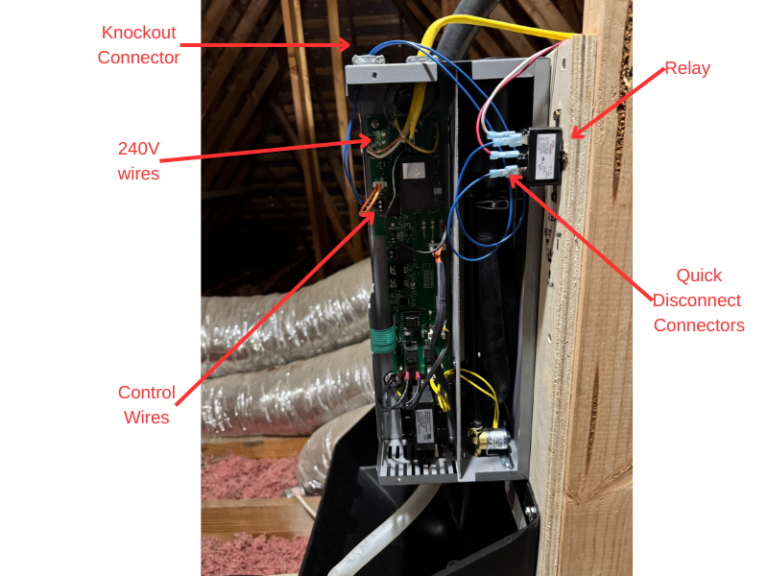
See below for example of how I installed the electrical connections to the humidifier and the isolation switch.
As soon as you power on the HVAC and Nest, it will detect that the humidifier is installed and you can now control humidity from your Nest app! If you go to the equipment settings in your app, you will see a a new connection on the * pin, looking something like the picture below (note this is for a dual speed system, so your other wires may look different)
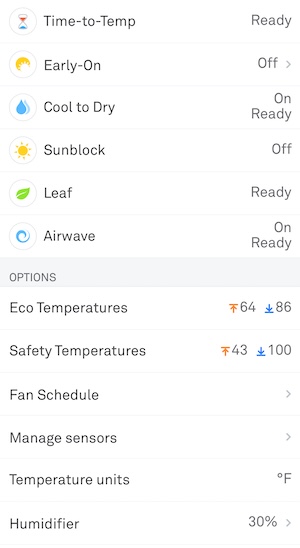
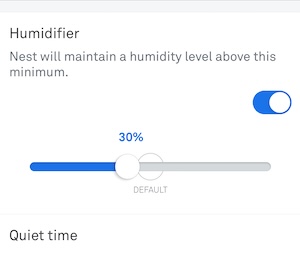
To activate your humidifier, go to your Nest settings, then select Humidifier menu item to show the Humidifier configuration as per the instructions below. Switch the toggle to ON to activate the humidifier. You will hear an audible “click” from the relay if your current humidity and temperature is lower than the Nest setting. You can adjust the nest from 10% to 60%, with the default of 35% likely being ideal for most houses. The Nest will only switch on the humidifier if the fan is going.
Step 3: Deploy Plumbing
The AprilAire 800 humidifier needs a cold water supply to make steam. The kit includes a self-tapping saddle valve to connect to your cold water supply line. You will need to buy additional 1/4″ copper tubing to reach the humidifier dependent on the distance from your water pipe to the humidifier. In addition, you will need a 1/4 emergency ball valve and a water hammer arrestor. If installing in non-temperature controlled area like an attic, the entire water line requires foam insulation.
If installing the humidifier higher than the HVAC duct, you will need to buy the optional Steam Drain Trap kit to prevent condensed steam from leaking into your duct.
If installing the drains lower than your planned drain system, you will need a pump to move the water “uphill” to your drain of choice.
There are 3 drains with the humidifier installed higher than the duct.
Primary – Connects humidifier to main HVAC drain
Secondary – Connects the steam trap to main HVAC drain
Emergency – Connects drain pan to emergency/overflow drain of HVAC
Some installers and local codes require you to run dedicated drains outside due to the high temperature of the water. Check what is permitted in your area. The highest water temperature discharge from the humidifier to the PVC pipes is under 140F, which is the max rating for most brands of PVC.
See below for an example of how to install the plumbing. (Make sure you know your local code or you should hire a plumber for this part!)
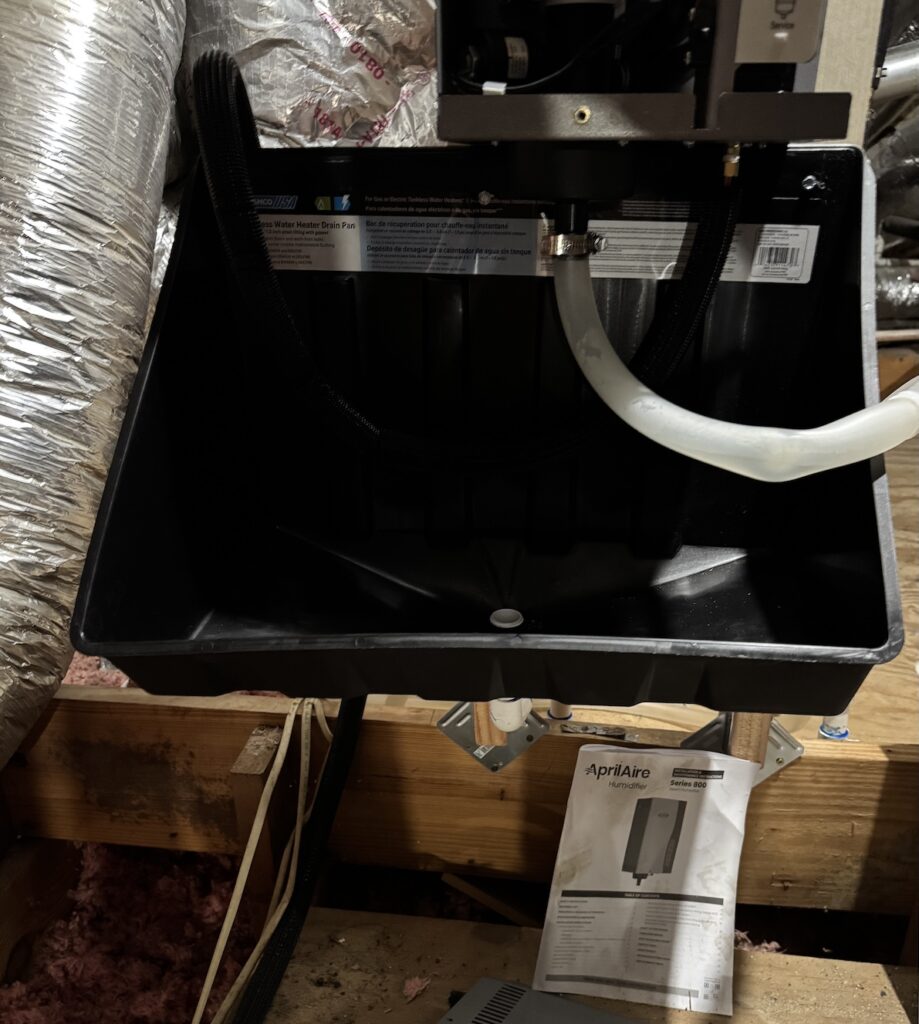
Drain pan installed under humidifier. Primary drain host shown in the center.
Now you are all set with a fully operational AprilAire 800 humidifier being controlled by your Nest Learning Thermostat for a better living space without the dryness.
If you want the “Easy” button to get all of the accessories needed to install, click on the links below to order from Amazon.com and SupplyHouse.com
Buy Humidifier
Buy accessories
Buy Steam Trap (optional)
Buy Sump Pump (optional)